Smartflows WhatsApp Integration allows your customers to reach you through their preferred messaging application: WhatsApp. On the other end, your agents will be able to promptly respond directly from Agent Chat Console.
Quick replies, action buttons and media like images, videos and documents are supported on both sides.
Basically, to enable the WhatsApp channel for Smartflows, you need to create and configure a WhatsApp Business account and connect to Smartflows following the instructions reported below.
The article drives through the creation of what is needed on Meta to connect Smartflows, through the following main steps:
Create the “Meta for Developers” App.
Create the “Meta Business account”, if not available yet.
Test the Meta Business account and WABA with the test number auto assigned, to send a WhatsApp test message to a number (ex: your mobile number)
Associate a real phone number to the WABA (ex: your company number), that requires a Phone verification (you will receive a phone call on that number). This will be the number to publish in order to interact with customers via WhatsApp: NOTE you will need to associate a payment method to send/receive messages.
Configure a “Permanent Access Token” to the created App. This will be needed to connect a Smartflows project.
Connect the App to Smartflows.
Requirements
A company phone number (landline or mobile) to be associated to the WhatsApp service. The number should not be already associated to a WhatsApp profile. See here for details.
A valid Meta Business Manager account (https://business.facebook.com)
A valid Meta for Developers account (https://developers.facebook.com )
Valid Credit Card data, to be specified as payment method to pay WhatsApp traffic.
Procedure
1. Create meta for developer app.
To use a WhatsApp Business account from third party applications like Imagicle Smartflows you need to create an integration app.
Go to Meta for Developers web site and sign in with you Facebook credentials, where you can see your Facebook apps:
click on "My Apps", and on "Create App"
select “Other” as use case
select “Business” as App type
insert the App Name “Imagicle Smartflows” and the contact email.
In the business portfolio, if you already have a Business Account, select it, otherwise leave “No Business portfolio” selection and click on “Create app”.
Now you are in the Meta App configuration page: make sure that you have selected the app where you want to install WhatsApp and search “WhatsApp" from the products list, then click “Set up”.
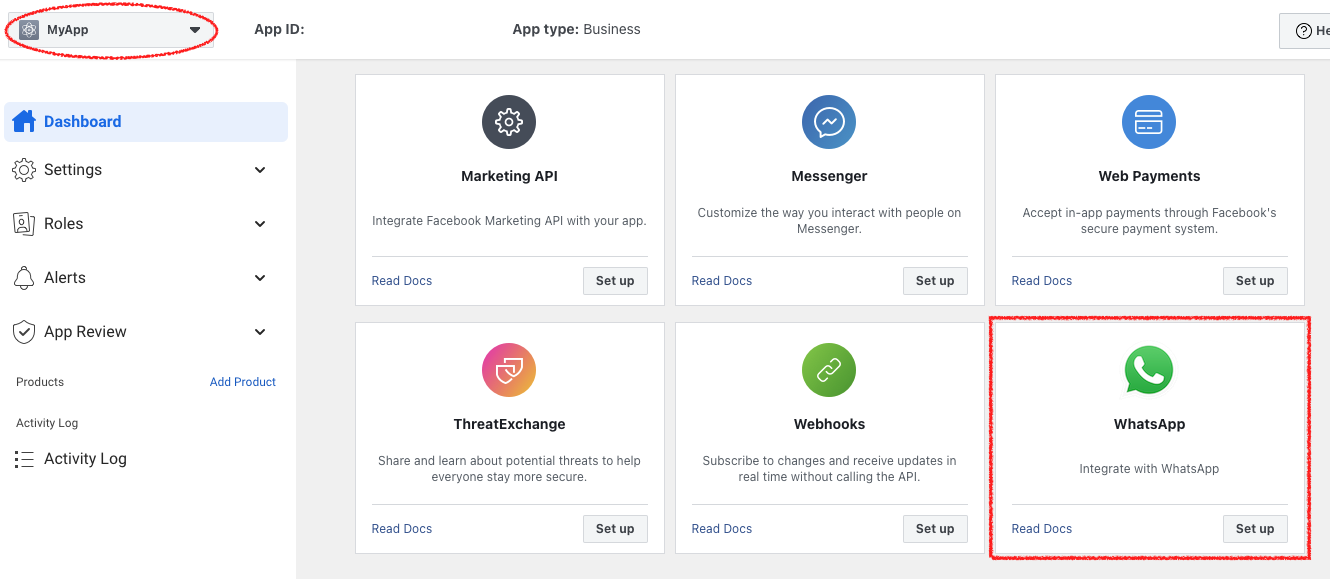
You should be able to see that on the left-side bar. Click on “Getting Started”. If you've selected a Business Account in the previous step, you can skip directly to Step 3, otherwise keep reading!
2. Create a Meta Business Account
After clicking on “Getting Started” you will see the tool for selecting or creating a business account. Select “Create a business account” from the dropdown menu and click “Continue”.
Alternatively you can go here to create a new one directly via the Meta Dashboard.
A Meta Business account is needed to associate and manage resources like WABA:
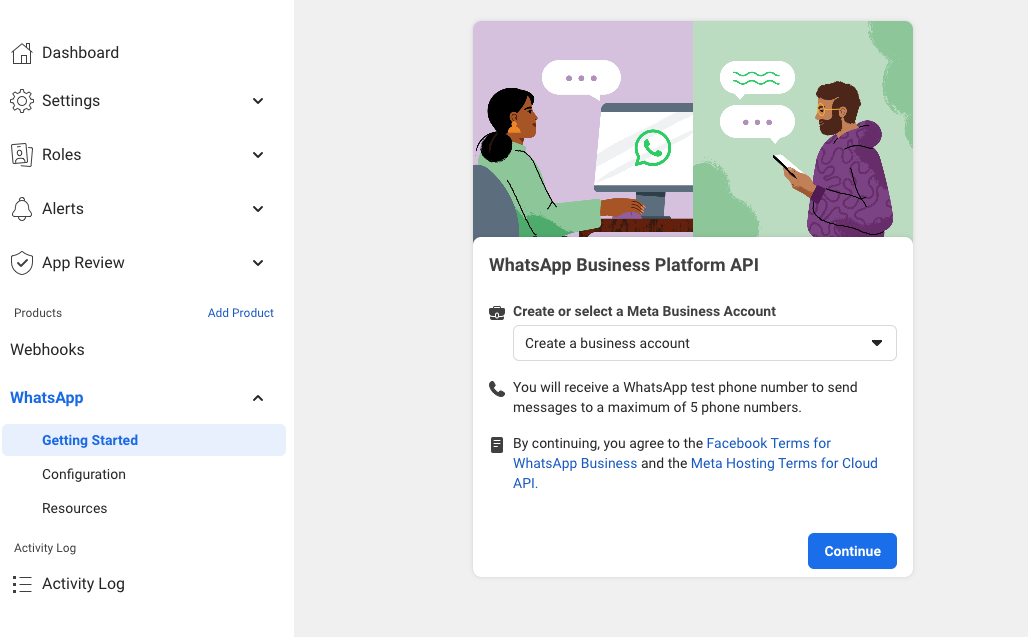
A default Business Account has been created.
You can customize this account accessing the Meta Dashboard.
Note: to use the WhatsApp Buisness account you need to Add a payment method to your Meta Business Account. You can add a payment method in the Meta Dashboard by clicking on Account→WhatsApp accounts and click on Payment settings, as per the image below.

3. Test the integration
On Meta for Developers, click on “Getting Started”, you can test the WhatsApp integration, but first you need to configure a receiver number.
Note: In this testing phase, you can send a message from a test number (provided by Meta) to up to 5 mobile numbers to test messages sending.
To configure a test phone number click on the “To” dropdown, and then on “Manage phone number list” button.
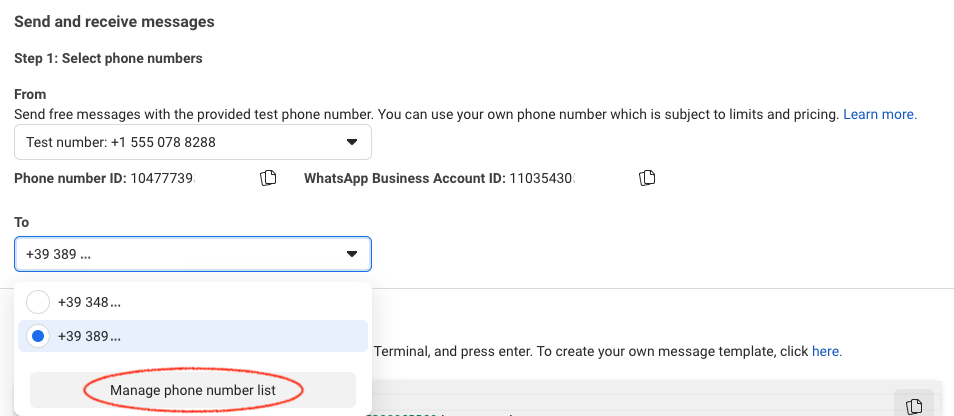
Select the prefix and insert the mobile phone number, then start the verifying procedure by clicking on "Next" (a numeric code is sent by SMS).
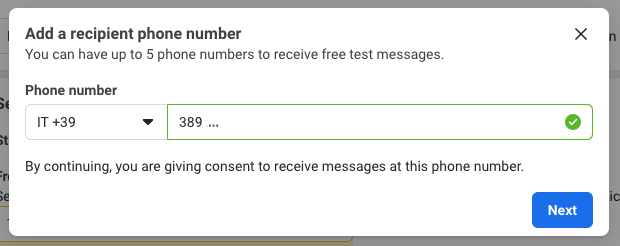
Once completed, the phone number can receive test messages. Click on “Send Message” button to try it out. You should receive a message on WhatsApp from the test number.
4. Associate a real phone number
Now you need to register a company production phone number (the one that your end-users will contact to interact with Smartflows).
It can be either a landline or a mobile number.
Note: use of a private mobile number is highly discouraged. You won't be able to use the WhatsApp mobile app anymore.
You can associate multiple numbers to the same WhatsApp Business account.
From the Getting Started page, click on “Add phone number”, as below.

Fill in your business information and click on “Next”. Those info will be associated to the WhatsApp account and will be visible to your end-users on WhatsApp.

Fill in the required information to create a WhatsApp Business profile and click on “Next”.
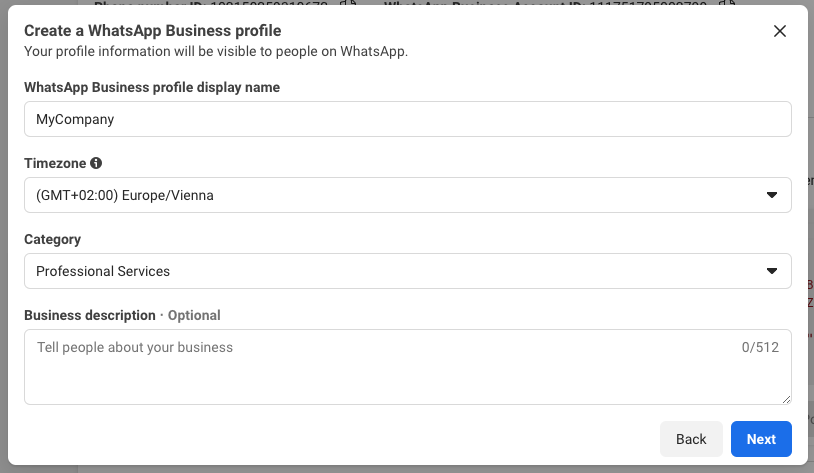
Finally, add the phone number and verify it through a Text message or Phone call.
Note: If you are using a landline number, you can verify the number only with a Phone call.
Both the methods will provide you a unique temporary code to be inserted in the verification form.
Once the number has been approved, you can test it sending out a Whatsapp message, as shown earlier in this guide, by selecting the production number from the “From” dropdown.
5. Configure a Permanent Access Token
To use the WhatsApp integration with Smartflows you need to generate a valid access token for your App. Let's see how to create a Permanent Access Token.
Click on the name of the Business Account in My Apps or go directly in Facebook Settings Dashboard from the Facebook Developer dashboard.
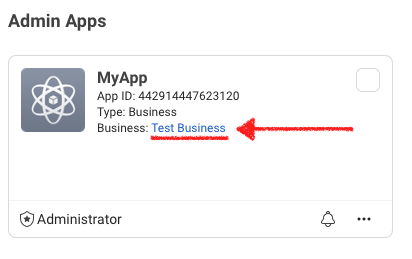
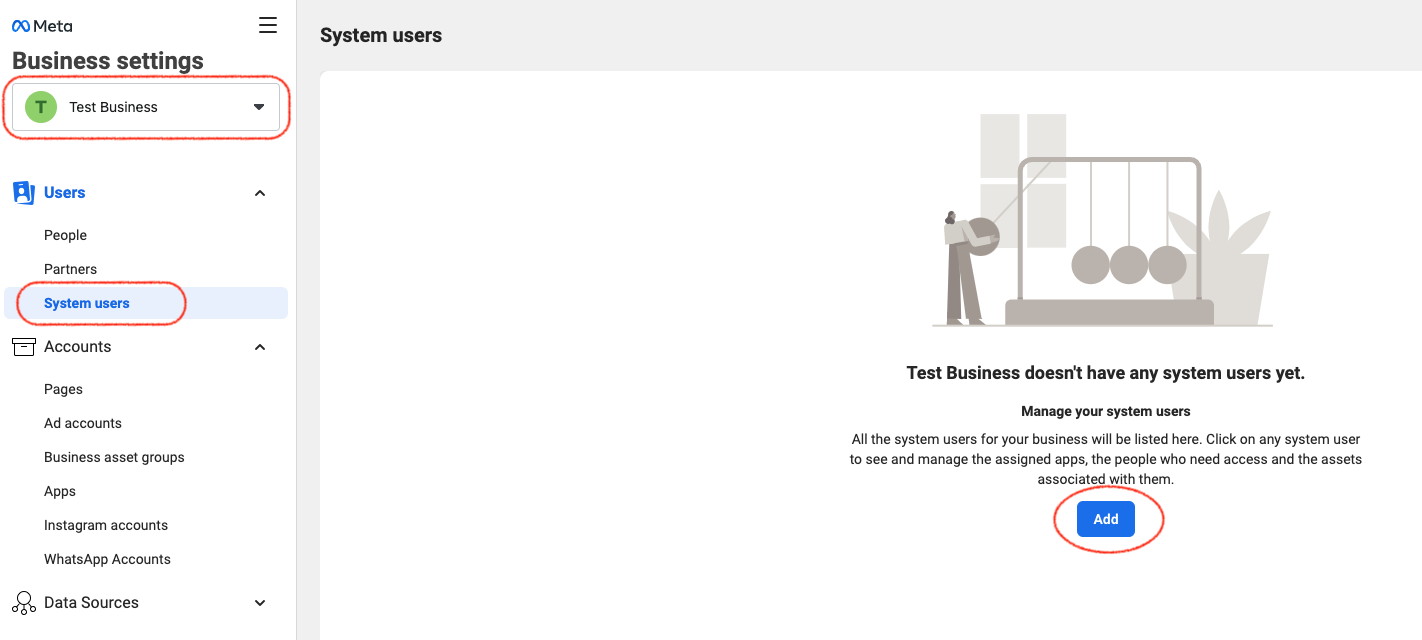
On the left-side panel, make sure that Business Account for which you want to activate the permanent token is selected, click on “System users” and then click the “Add” button.
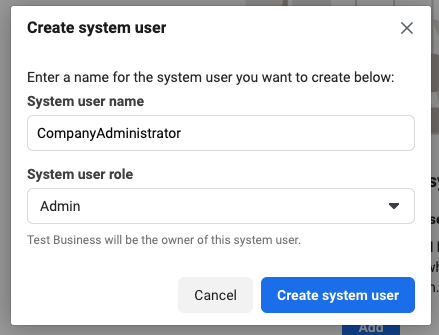
Specify the system user name “ImagicleSmartflows” and choose Admin role.
Now you can click on the “Create system user” button:
A user system has now been created. Note that the permanent token will be associated to that user.
Let's add assets to the newly created system user by clicking on “Add Assets” and giving the Full Control to the Facebook App, as illustrated below.
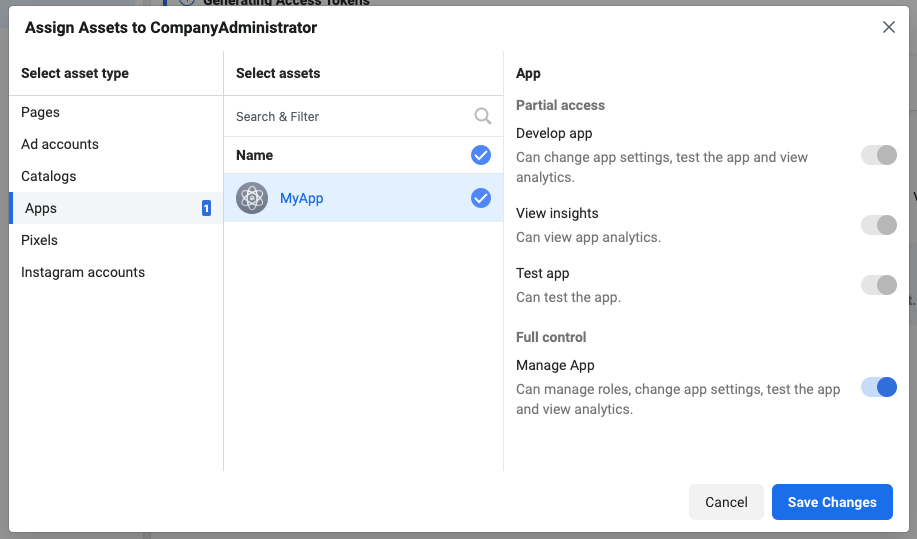
Click on “Save Changes” and the app will be added to the system user.
Finally, we are ready to generate our Permanent Access Token by clicking on “Generate new token”. Select the app…
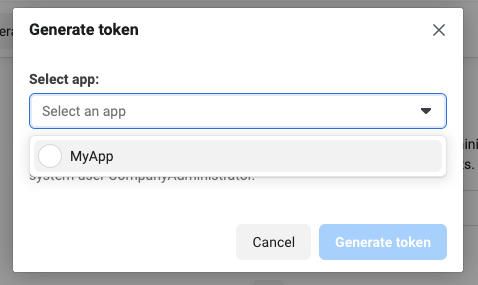
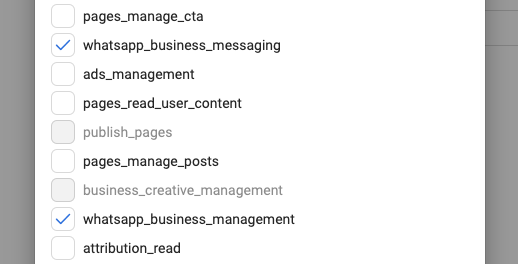
… and check the following permissions:
whatsapp_business_messaging
whatsapp_business_management
Click on “Generate token” and that's it! Your permanent token is now available. Copy it, you’ll need it in the next steps.
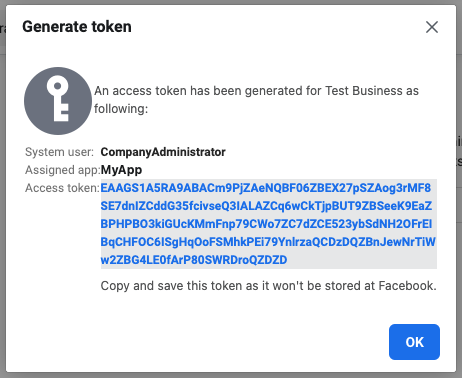
Next you need to connect the WhatsApp business account to Smartflows.
6. Connect to Smartflows
The 5 steps above were needed to setup the WhatsApp account on Meta platform.
Now you have 2 important ID:
Meta Business ID, identifying the Meta Business Account
WABA ID, identifying the WABA Account
Note: You need the WABA ID to configure into SmartFlows WhatsApp integration to connect.
(IMPORTANT: Business ID won’t work).
To retrieve the WABA ID you can check here: https://business.facebook.com/wa/manage
The ID highlighted in green is the WABA ID. Keep this ready for connecting your App to Smartflows.

Login into the Smartflows console and on the left-bar menu to go to “Integrations” and click on WhatsApp:

Now:
copy your WhatsApp permanent token created at Step 5 above and paste it in "WhatsApp Token"
Type a verify token (any string, i.e. "my-verify-token") in the “Verify Token” field.
Add your WABA ID you took note above
Select the department you would like this WhatsApp app being connected to
Click on the “Update” button. Your app is now connected.
Then click on “Copy” button to copy the webhook endpoint to clipboard, then move to Facebook Developer Console and open the app you created at Step 1 above:

On the left-side menu, underneath products section, go to WhatsApp → Configuration. Then click on “Edit” and paste the URL you copied earlier in “Callback URL". Type in the verify token you typed earlier on Smartflows, then click on “Verify and save” button.
If the verification fails, please check your configuration parameters.
Now click on “Manage”:

Click on “Subscribe” for messages option, then click on “Done” button.
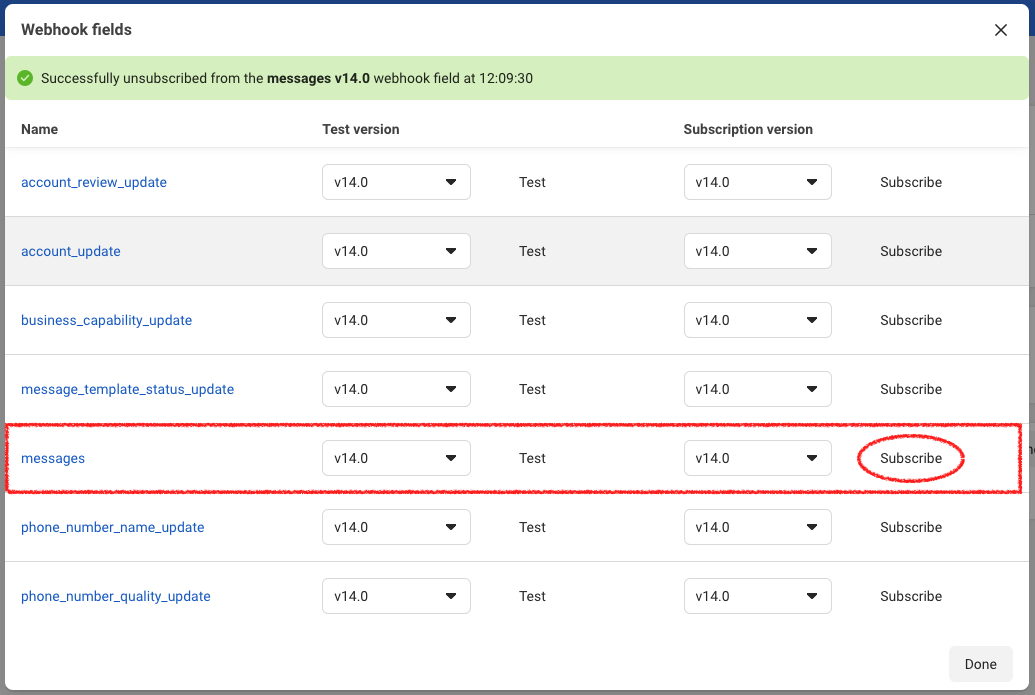
Well done! The configuration is now completed and you should be able to receive message from WhatsApp to your Smartflows chat.
If a chatbot has been configured, it will the first one to greet your customers!
Additional information
Change WABA display name
If you want to change the way your WABA is displayed on WhatsApp, you need to change on WhatsApp manager and then verify via API.
Go to WhatsApp Manager and click on the WABA name:

Then click on Phone Numbers:

Then click on Edit display name:

You can change the name and it will take some time to be validated, based on WhatsApp based policies.
After having changed, you will need to validate via API called by Postman or CURL.
curl -i -X POST 'https://graph.facebook.com/v19.0/266564196533384/register' -H 'Authorization: Bearer YOUR_PERMANENT_TOKEN' -H 'Content-Type: application/json' -d '{ "messaging_product": "whatsapp", "pin": "YOUR_PIN" }’
For your permanent token, please refer to the basic guide above. If you did not take note of, you will need to generate a new one.
